BLT3-400 Fuse Block Installation Guide for Marine, RV, and Automotive Applications

Proper installation of the BLT3-400 fuse block ensures reliable power distribution and protection for your marine, RV, or automotive electrical system. This guide provides step-by-step instructions for safely mounting the fuse block, connecting battery and inverter cables, and selecting the correct fuse for your application.
Before You Start
Safety Precaution
- Always turn off all AC/DC power sources before starting the installation to prevent electric shock.
Tools Needed for Fuse Block Installation
- ¼” or M6 mounting hardware
- Torque wrench (in-lbs or N-m)
- Pliers (for cover installation)
Choosing the Right Location
As close to the battery’s positive terminal as possible:
- Marine Installation: Place the fuse block within 7 inches of the battery’s positive terminal (per ABYC standard).
- RV/Automotive Installation: Place within 18 inches of the battery’s positive terminal; under 7 inches is preferred.
- General Rule: Keep the fuse block as close as possible to the battery’s positive terminal.
Clearance Requirements:
- Leave at least 6 inches between the fuse block and nearby equipment.
- Allow extra space if near grounded metal surfaces.
Secure Mounting Surface:
- Ensure the mounting surface is flat and strong enough to securely hold the fuse block.
Installation Steps
Step 1: Mount the BLT3-400 Fuse Block
- Use ¼” or M6 screws for mounting.
- Tighten screws to 72 in-lbs (8.1 N-m) torque to ensure a firm hold.
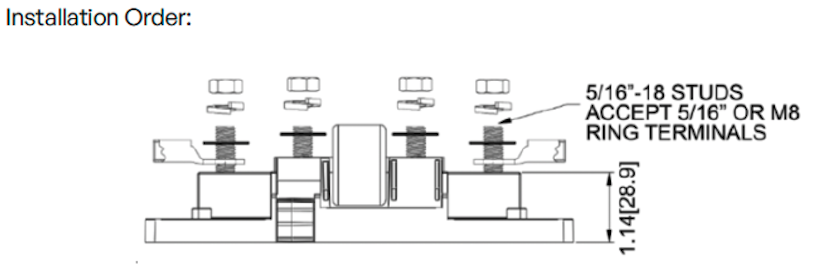
Step 2: Install the Fuse in the BLT3-400 Fuse Block
- Install F3T Fuse, then the flat washer, lock washer, and hex nut in that order.
- Tighten to 107 in-lbs (12.9 N-m) torque to ensure a firm connection.
- The connection can safely handle up to 27.6 N-m if needed.
Step 3: Connect the Battery Cable to the Fuse Block
- Place the battery cable lug onto the fuse block terminal.
- Follow the same order: flat washer → lock washer → hex nut.
- Tighten to 107 in-lbs (12.9 N-m) torque for a secure connection.
- The connection can safely handle up to 27.6 N-m if needed.
Tip: Make sure wires are routed perpendicularly so they can exit cleanly once the cover is on.
Step 4: Connect the Inverter Cable to the Fuse Block
- Place the inverter cable lug onto the fuse block terminal.
- Install flat washer → lock washer → hex nut.
- Tighten to 107 in-lbs (12.9 N-m) torque; connection can handle up to 27.6 N-m if needed.
Tip: Make sure wires are routed perpendicularly so they can exit cleanly once the cover is on.
Step 5: Install the Fuse Block Cover
- Use pliers to lift the side tabs so wires can pass through.
- Snap the cover into place and secure using the two latching arms until they click.
Choosing the Right Fuse
4/0 AWG (107.16 mm²)
2/0 AWG (67.4 mm²)
360A
265A
400A
300A
*Values can vary. Always consult a qualified electrician when configuring your system.
Learn more about Industrial Fuses and How They Protect Your Systems and see our Fuse Selection Guide for complete context.
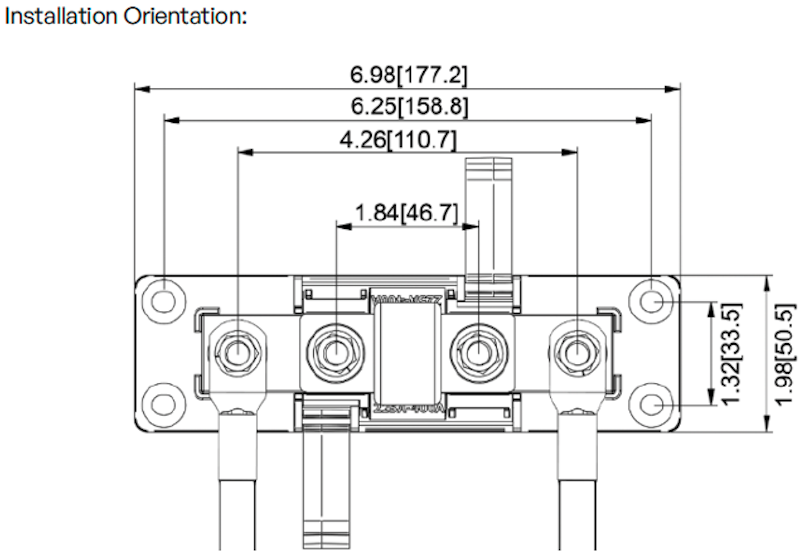
Installation Diagram
Sebastian Castañeda, Application Engineer at OptiFuse, supports customers with technical solutions, custom circuit protection design, and training. He provides tailored guidance and shares expert insights on the OptiFuse Blog.